Tips for Piecing FPP Angles


Quite a few of you have asked for tips about how to assemble the sidewalk portion of my ‘Home for the Holidays’ pattern. Angled pieces seem to trip up FPP’ers, but I’ve got an easy solution. The tip I’m about to share works well for the sidewalk/ground portion of my pattern, but you can use it on any section in an FPP pattern that you want to ensure the correct angles or even a perfect fussy cut.
Let’s walk through the making of a sidewalk/ground portion of this pattern.
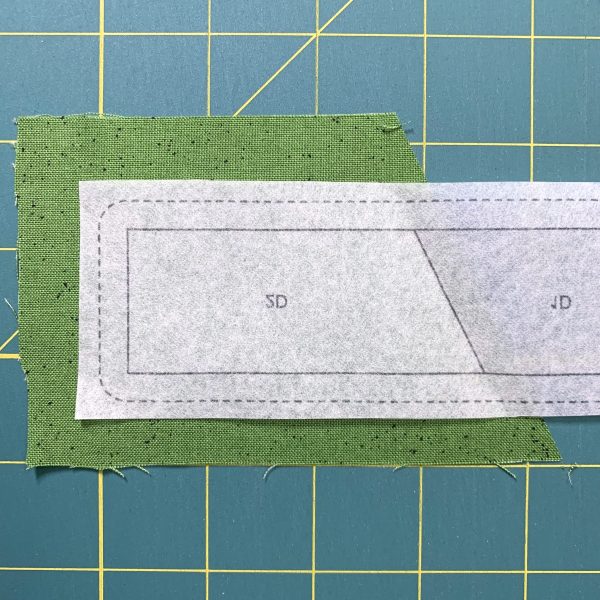
Photo 1: Choose a scrap for the sidewalk piece (1D). As with all FPP, the scrap needs to be at least 1/4” larger on all sides than the area you’re piecing. I’ve chosen a gray scrap. Lay the sidewalk paper template on top of your sidewalk scrap, printed side down (so that you’re looking at the wrong side of the paper) and ensuring the scrap extends past all edges.
Photo 2: Place the edge of your piece of card stock or whatever you use to FPP, on the righthand stitch line of the sidewalk, fold the paper back and using your Add-a-Quarter ruler, trim away the excess.
Photo 3: You now have a pre-cut angle for the sidewalk piece.
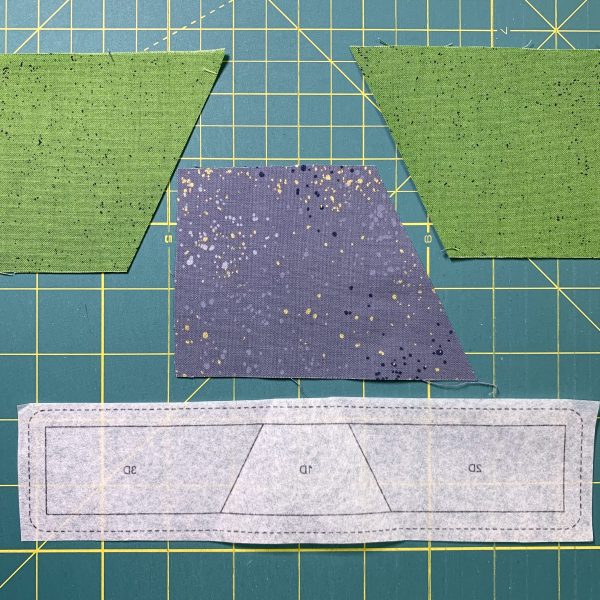
Photo 4: Choose scraps for the two ground pieces (2D and 3D) ensuring the scraps are large enough to extend at least 1/4” past all borders of each section. Rotate the paper template so that it reads as upside down and is still printed side down as shown in the photo. (I’m right-handed, so this makes trimming easier.) Place the edge of the piece of card stock on the righthand stitch line, fold the paper back and using your Add-a Quarter ruler, trim away the excess.
Photo 5: You now have a pre-cut piece for 2D.
Photo 6: Now grab your second ground scrap. Rotate the paper template so that it reads right side up but the paper should still be printed side down.
Photo 7: Repeat the same process with your card stock and Add-a-Quarter ruler, trimming away the excess.
Photo 8: You now have three pre-cut pieces for stitching the sidewalk/ground portion. Don’t worry about the other angle of the sidewalk as you’ll trim that during the FPP process.
Photo 9: FPP. With the printed side of the paper down, lay the sidewalk scrap right side up with the trimmed edge 1/4” over the stitch line between 1D and 2D. Lay the pre-cut scrap for 2D right side down, aligning the pre-cut edge with the edge of the sidewalk scrap. Carefully flip the fabric and paper template over and stitch the line between 1D and 2D.
Photo 10: Open and press the ground scrap to the side.
Photo 11: Continue the FPP process. Trim the excess of 1D, align fabrics and stitch 3D onto the template. Open and press the second ground scrap to the side. Trim away excess using the dashed trim lines as guides.
Stay up to date!
Subscribe to receive occasional emails about new pattern releases, shop sales and exciting news updates.